A strongly-typed language like Swift is a big blessing. I truly love how refactoring of code becomes a less scary operation. Today if I change the type of a variable, it won't compile (ok, I can hear you ask about "Any"... just don't), and when it won't compile, it won't hurt me that much.
As you probably know, Xcode today (version 6.3) doesn't have refactoring tools for Swift - pity, but even with a tool we know from the age of Objective-C, it won't work for "String" keys.
String based keys are a real pest, especially for a language like Swift.
What are String based keys?
self.performSegueWithIdentifier("ScreenOneSegue",send: nil)
"ScreenOneSegue" is an identifier for Segue, yet it is just a text, like any other text. The thing is that this one you have to care about. You have to update every occurrence of this text whenever you update it for example in a Storyboard file. In case you work with team, and something happens in the middle of a branch merge... you just lost time for debugging, searching a text value around the project. BECAUSE STRING KEYS CAN'T BE VERIFIED BY THE COMPILER. This is so not Swift way.
I'll show you how it is now, and how it may be improved.
Storyboard setup
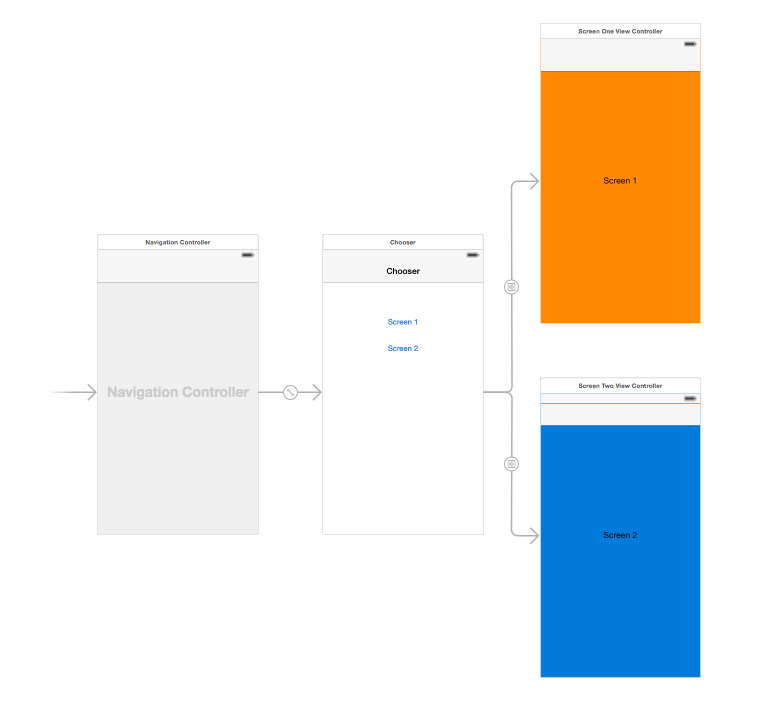
I have a Main.storyboard file with four view controllers and two transition segues. MainViewController is the main view controller with two buttons. Whenever the user presses button Screen 1 application moves to ScreenOneViewController, when user presses Screen 2 application will transition to ScreenTwoViewController.

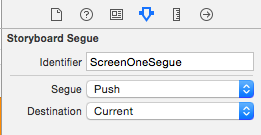
Inside my Storyboard I have defined two segues, with custom identifiers:
- ScreenOneSegue
- ScreenTwoSegue

and two actions for buttons, to trigger appropriate Segues:
@IBAction func screen1ButtonPressed(button:UIButton) {
    self.performSegueWithIdentifier("ScreenOneSegue", sender: self)
}

@IBAction func screen22ButtonPressed(button:UIButton) {
    self.performSegueWithIdentifier("ScreenTwoSegue", sender: self)
}
and here you can find these two unmanageable strings:
- "ScreenOneSegue"
- "ScreenTwoSegue"
Each of these labels has to be used inside prepareForSegue() to distinguish between segues for view controller. In general typical prepareForSegue() implementation looks like this:
override func prepareForSegue(segue: UIStoryboardSegue, sender: AnyObject?) {
    if let segueIdentifier = segue.identifier {
        switch (segueIdentifier) {
        case "ScreenOneSegue":
                if let oneViewController = segue.destinationViewController as? ScreenOneViewController {
                    oneViewController.view.backgroundColor = UIColor.yellowColor()
                }
            break
        case "ScreenTwoSegue":
            if let twoViewController = segue.destinationViewController as? ScreenTwoViewController {
                twoViewController.view.backgroundColor = UIColor.magentaColor()
            }
            break
        default:
            break
        }
    }
}
As you can see I modify background color of the destination view, just before transition.
The Problem
I don't want to work like this, with all these strings and storyboard identifiers as strings.
Solution
This is why I started Natalie project.
Natalie
I started Natalie - Storyboard Code Generator (for Swift) as a proof of concept to address the String issue for strongly typed Swift language. Natalie is a Swift script (written in Swift) that produces a single .swift file with a bunch of extensions to project classes along the generated Storyboard enum.
Since Natalie is a Swift script, that means it is written in Swift and requires Swift to run. The project uses SWXMLHash as a dependency to parse XML and due to framework limitations all code is in a single file.
The script can generate code for a single storyboard, or for a whole project (it will search for storyboards).
Storyboards are accessible with enum Storyboard
enum Storyboard: String {
    case Main
    case Second
    ...
    func instantiateInitialViewController() -> UIViewController? { ... }
    func instantiateViewControllerWithIdentifier(identifier: String) -> UIViewController { ... }
}
It is worth mentioning that instantiating functions cast the object to the right class, depending on the Storyboard setting. For example if the initial View Controller is a UINavigationController, it will be cast to UINavigationController. Instantiating a View Controller is that easy now:
let vc = Storyboards.Main.instantiateInitialViewController()
Every View Controller has some Segues defined, in this example there will be two of them:
MainViewController.Segue.ScreenOneSegue
MainViewController.Segue.ScreenTwoSegue
These can be conveniently used in code to trigger segues, so new versions of actions will look like this:
@IBAction func screen1ButtonPressed(button:UIButton) {
    self.performSegue(MainViewController.Segue.ScreenOneSegue, sender: nil)
}
No Strings attached :) All type checking!
Corresponding prepareForSegue() will look like this:
override func prepareForSegue(segue: UIStoryboardSegue, sender: AnyObject?) {
    if let selection = segue.selection() {
        switch (selection, segue.destinationViewController) {
        case (MainViewController.Segue.ScreenOneSegue, let oneViewController = segue.destinationViewController as? ScreenOneViewController):
                oneViewController.view.backgroundColor = UIColor.yellowColor()
            break;
        case (MainViewController.Segue.ScreenTwoSegue, let twoViewController = segue.destinationViewController as? ScreenTwoViewController):
                twoViewController.view.backgroundColor = UIColor.magentaColor()
            break;
        }
    }
}
It is important to mention that it is not my intention to change Storyboards default flow. This is why the code is very similar to the original version and thanks to this, it is easy to adapt.
Installation
There is no need to do any installation, however if you want easy Xcode integration you may want to install the script to be easily accessible for any application from /usr/local/bin
$ git clone https://github.com/krzyzanowskim/Natalie.git
$ sudo cp natalie.swift /usr/local/bin/natalie.swift
maybe at some point in the future I'll work out how to create a homebrew recipe to make the installation easier
Code generation
Download Natalie from Github: https://github.com/krzyzanowskim/Natalie and use it in the console, for example like this:
$ git clone https://github.com/krzyzanowskim/Natalie.git
$ cd Natalie
The script expects one of two types of parameters:
- path to a single .storyboard file
- path to a folder
If the parameter is a Storyboard file, then this file will be used. If a path to a folder is provided Natalie will generate code for every storyboard found inside.
$ ./natalie.swift NatalieExample/NatalieExample/Base.lproj/Main.storyboard > NatalieExample/NatalieExample/Storyboards.swift
Xcode Integration
Natalie can be integrated with Xcode in such a way that the Storyboards.swift file will be updated with every build of the project, so you don't have to do it manually every time.
This is my setup created with New Run Script Phase on Build Phase Xcode target setting. It is important to move this phase above Compilation phase because this file is expected to be up to date for the rest of the application.

echo "Natalie generator"
/usr/local/bin/natalie.swift "$PROJECT_DIR/$PROJECT_NAME" > "$PROJECT_DIR/$PROJECT_NAME/Storyboards.swift"
Don't forget to add Storyboards.swift to the project.
Conclusion
I like it! yeah.... but really: I like it!
Sources of Natalie (with sample project) are available in the GitHub repository: https://github.com/krzyzanowskim/Natalie
The project is in the early stage, and I'm gonna use it for my projects. If you like this solution don't hesitate to star or share it. I would love to see a lot of Pull Requests with improvements.
In case of any questions you can contact me on Twitter @krzyzanowskim
You can discuss on Hacker News: https://news.ycombinator.com/item?id=9381544
PS. Cover photo by Steve Snodgrass